How to Get Arc on Your Jump Shot (3 Keys + Drills)
How to Get Arc on Your Jump Shot With 3 Keys From Coach Meech
Flat shots die at the front of the rim. Sky-high launches stall and come up short. Coach Meech from I Love Basketball TV breaks down how to get arc on your jump shot with three keys: the right release angle, your wrist under the ball, and leg power attached at the set point. Then he gives you drills and a short progression so you can feel the fix, not just hear it.
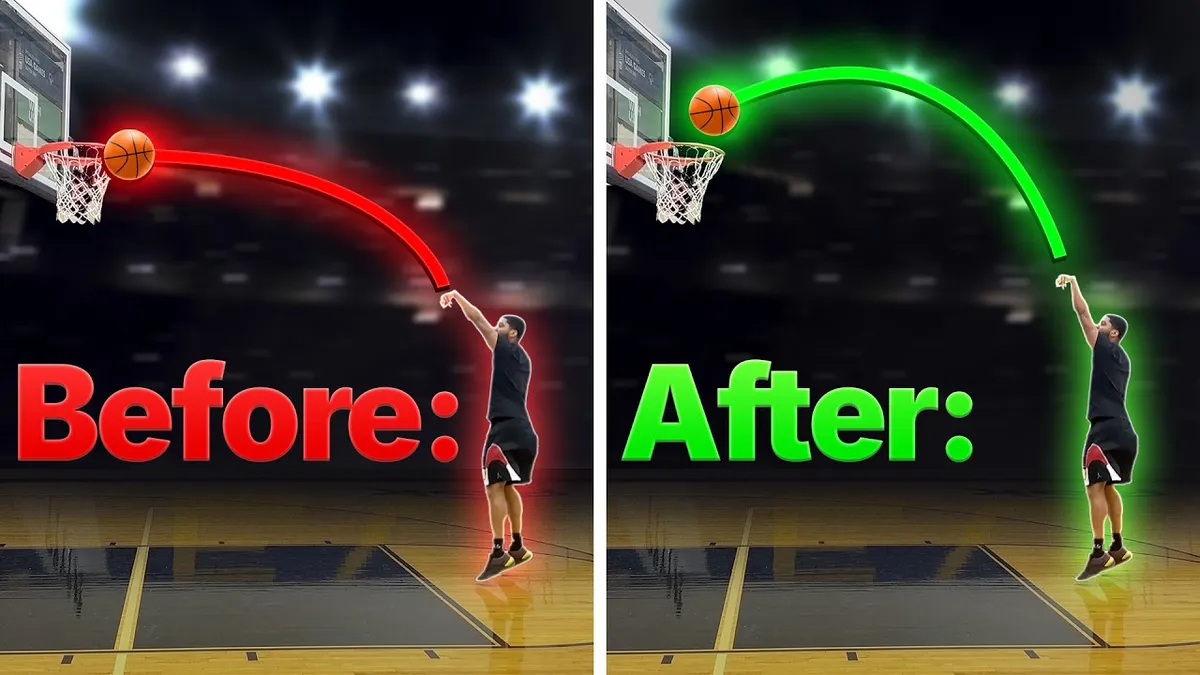
More arc gives the ball more room to fall through the middle of the rim. That middle is the biggest target. When the ball comes in too low and flat, that sweet spot shrinks and every miss feels like a brick.
<iframe width="560" height="315" src="https://www.youtube.com/embed/Ph6-w-LCpYo" title="3 Keys to Fix Your Jump Shot and Get Perfect Shot Arc" frameborder="0" allow="accelerometer; autoplay; clipboard-write; encrypted-media; gyroscope; picture-in-picture; web-share" allowfullscreen></iframe>
Why arc matters (and what “perfect” actually means)
The goal is not a circus lob. The goal is a path that goes up high enough to clear the rim and out far enough to cover the distance. Hit the middle of the rim and you give yourself the largest margin for error.
Two extremes kill that margin:
Too flat / straight-line shooters: You get to your set point and push the ball straight out. The ball wants to drive into the front of the rim.
- Too high: You push straight up. The arm goes vertical with you. The ball climbs but does not travel out, so it falls short or dies early.
You will not nail the exact angle every time. A little high or a little low is fine. Stay out of the extremes.
If you want more shooting reps that pair with these arc cues, start with our [basketball shooting drill](https://ilbelite.com/post/basketball-shooting-drill) post, then come back to the three keys below.
Key 1: Perfect release angle (up and out)
The cleanest way to get arc is a correct release angle. Coach Meech cues the release around eyebrow level. At your set point, push the ball up and out so your elbow finishes near eyebrow height. That sends the ball high enough above the rim and far enough to cover the distance.
Mental check:
Flat shooter? You are pushing straight out from the set point.
- High shooter? Your arm is going straight up and the ball never travels out.
Aim for the middle of that range. Eyebrow-level release. Up and out together.
Drill: Backboard bounce arc test
Line up on the side of the backboard and get close enough to challenge the angle without forcing a skyball.
If you release too flat, the ball hits the glass and comes straight back to you.
- If you release too high, the ball drifts toward the board, misses it, and hits the floor.
- If the angle is right, you hit the backboard and the ball bounces on the floor right in front of you.
That bounce in front of you is the feedback. Enough arc to clear. Enough out to still catch glass.
Distance tip: closer makes the drill harder. Farther makes it easier. Do not crowd the board so much that you are forced to release higher just to get a bounce. Find a comfortable distance where you can keep the eyebrow-level release.
Key 2: Get your wrist under the basketball
Before you can push up and out, your wrist needs to sit under the ball at the set point. If the wrist is behind the ball, the up-and-out angle gets harder. Wrist under makes the push cleaner.
Two common ways this breaks:
Set point too low. Players drop the ball a bit to chase range. The hand creeps behind. Now you push more out than up.
2. Set point too high. Ball sits far above the head with the hand too far under. From there the natural move is to pop the ball straight up, which wrecks the release angle from Key 1.
Coach Meech wants the ball somewhere near the front of your face, where the wrist can get under it and you can still push up and out toward the rim.
Drill: One-hand shooting for control
It sounds basic. It works. You do not have to stand under the rim doing slow form shooting only. You can back up. You can shoot free throws. You can even take threes with one hand in a controlled setting.
Why it works: one hand has to control the whole ball.
Wrist stays behind on a low set point? The ball wants to drop forward.
- Ball too high above the head? It wants to fall back and you lose control.
The ball settles into that front-of-face pocket so you can push up and through the middle with the wrist underneath. That is the position that feeds a cleaner arc.
Players who need a full shooting system after they fix arc often look at [Gametime Shooter](https://ilbelite.com/gametime-shooter). Use that only when you are ready for a longer program. The keys in this video stand on their own for todays reps.
Key 3: Attach your legs at the set point (timing, not “jump more”)
Most hoopers already jump on their shot. The issue is timing. If you burn leg power before the ball is ready, the finish becomes all arms and the arc suffers.
Correct sequence from Coach Meech:
Lift the ball first.
2. When the ball reaches about the set point, attach the legs and extend up.
3. Power under the ball and power from the legs meet at the same time so the energy goes into the shot.
What goes wrong:
Jump first, then try to catch up with the ball. Legs are spent. Arms take over.
- Move everything at once from a deep load. Hips have a shorter path than the ball. Hips finish early. Again you finish with arms.
Cue: lift the ball, get it near the set point, then release the legs and jump into the shot so both power points arrive together.
Drill progression: feel the timing, then flow
Progression 1 Hold at set point
Get low. Move the ball to your set point first. Hold two or three seconds. Then jump and shoot. Take about 10 to 20 shots until it feels normal.
Progression 2 – Slow shots
Get low. Move the ball slowly to the set point. Once you arrive, speed up through the finish into a normal jump shot. Control your levels. Feel the ball move, then flow through the set point.
Progression 3 Full flow
Get set low and move the ball through the shot like a regular jumper. The first two progressions teach the feel. This one puts it together.
Work these in order. Do not skip straight to flow if your timing still feels rushed.
Putting the three keys together
When you ask how to get arc on a jump shot, stack the keys in this order:
Release up and out near eyebrow level (not flat, not straight up).
2. Wrist under the ball at a front-of-face set point.
3. Legs attach when the ball hits that set point so power meets power.
Use the backboard bounce test to check the angle. Use one-hand shooting to force wrist position. Use the hold → slow → flow progression to fix timing.
Need a quick read on whether shooting should be your main training focus right now? [Find your training strategy](https://ilbelite.com/#find-training) with the free training quiz on ILB Elite.
Parents watching film: look for line-drive releases, wrist sitting behind the ball, and early jumps before the ball reaches the set point. Those three are the tells Coach Meech calls out in the video.
Frequently Asked Questions
Why does arc help my jump shot go in more often?
Better arc gives the ball more room to enter the rim. The middle of the rim is the biggest target. A low, flat approach shrinks that target and makes the front rim a wall.
What release angle should I aim for?
Coach Meech cues an up-and-out release around eyebrow level at the set point. The ball should go high enough above the rim and out far enough to cover the distance. Avoid the extremes of flat line drives and straight-up pushes.
How do I know if my release is too flat or too high in the backboard drill?
Too flat: ball hits the backboard and comes straight back to you. Too high: ball misses the board and hits the floor. Right angle: you hit the board and the ball bounces on the floor in front of you.
Where should my wrist be at the set point?
Under the basketball, with the ball near the front of your face. Wrist behind the ball makes up-and-out harder. A set point that is too low or too high pulls the hand out of that pocket.
Why does one-hand shooting help arc?
You have to control the ball with one hand, so the wrist has to get under it. If the wrist stays behind, the ball drops forward. If the ball sits too high, it falls back. The ball settles into a controllable front-of-face position.
When should I use my legs in the shot?
When the ball reaches about the set point. Lift the ball first, then attach the legs and extend so leg power and ball position meet together. Jumping early leaves you finishing with arms.
What is the three-step timing progression?
Hold at set point for two or three seconds then shoot (about 10 to 20 makes the feel stick). Then slow the ball to the set point and speed up through the finish. Then full flow. The first two teach the feel. The last one puts it together.
Is a little high or a little low on the release okay?
Yes. Nobody is perfect every shot. Coach Meech says slightly higher or lower is fine. The problem is living at the extremes: fully flat or straight up in the air.
Find your training strategy
Arc is a form problem you can train today with a ball and a rim. If you want help choosing what to train next across shooting, handles, and finishing, take the free training quiz and [find your training strategy](https://ilbelite.com/#find-training).
<!-- SIDEBAR CTA: Find your training strategy → https://ilbelite.com/#find-training -->
Lock in the eyebrow release, get the wrist under, and time the legs. Coach Meech and I Love Basketball TV / ILB Elite will keep the cues simple so your jumper stops living on a line drive.